Loading... ## 为什么要使用VPN连接 - 防止被运营商标注为跑pcdn的黑名单 - 连接安全,防止在不安全的网络连接下的通信安全 - 远程安全,只需要开启2个UDP端口即可安全回家,无需暴露其他端口 ## 功能特性 * 支持具有强大和快速加密算法(例如 AES-GCM)的 IKEv2 模式 * 生成 VPN 配置文件以自动配置 iOS, macOS 和 Android 设备 * 支持 Windows, macOS, iOS, Android, Chrome OS 和 Linux 客户端 * 包括辅助脚本以管理 IKEv2 用户和证书 ## 环境要求 - 具有docker功能呢的openwrt(基于 Alpine的正常镜像),或者群晖nas等(基于Debian开发的群晖nas系统的docker镜像),建议安装在openwrt上 - 公网IP及DDNS域名 ## 安装步骤 #### 创建配置文件 SSH连接到openwrt,homelede可直接在后台连接终端 在root目录,创建一个ipsec的目录,并进人对应的目录 ```powershell mkdir ipsec cd ipsec ``` 新建一个`ipsec.env`配置文件及新建一个目录`ikev2-vpn-data` ```powershell mkdir ikev2-vpn-data touch ipsec.env ``` 使用vi命令编辑`ipsec.env` ```powershell vi ipsec.env ``` 写入以下内容 <div class="tip inlineBlock error"> 需要注意的是,所有的变量都需要用单引号包起来,因为我们使用挂载的模式进行部署,可以在修改此配置文件或者添加用户之后重启容器即可,无需重新部署容器 </div> ```powershell # Note: All the variables to this image are optional. # See README for more information. # To use, uncomment and replace with your own values. # Define IPsec PSK, VPN username and password # - DO NOT put "" or '' around values, or add space around = # - DO NOT use these special characters within values: \ " ' VPN_IPSEC_PSK='你的PSK' VPN_USER='你的用户名' VPN_PASSWORD='你的密码' # Define additional VPN users # - DO NOT put "" or '' around values, or add space around = # - DO NOT use these special characters within values: \ " ' # - Usernames and passwords must be separated by spaces # VPN_ADDL_USERS=additional_username_1 additional_username_2 # VPN_ADDL_PASSWORDS=additional_password_1 additional_password_2 # Use a DNS name for the VPN server # - The DNS name must be a fully qualified domain name (FQDN) VPN_DNS_NAME='你的DDNS域名' # Specify a name for the first IKEv2 client # - Use one word only, no special characters except '-' and '_' # - The default is 'vpnclient' if not specified VPN_CLIENT_NAME='VPN名称,自己喜欢的名字即可' # Use alternative DNS servers # - By default, clients are set to use Google Public DNS # - Example below shows Cloudflare's DNS service VPN_DNS_SRV1='你的路由的DNS地址,一般情况下填写你的路由IP即可' # VPN_DNS_SRV2=1.0.0.1 # Protect IKEv2 client config files using a password # - By default, no password is required when importing IKEv2 client configuration # - Uncomment if you want to protect these files using a random password # VPN_PROTECT_CONFIG=yes ``` #### 开启端口转发 在防火墙里的通信规则中允许4500和500的UDP端口  #### 部署镜像 SSH输入 ```powershell docker run \ --name ipsec-vpn-server \ --restart=always \ -v "/root/ipsec/ipsec.env:/opt/src/env/vpn.env:ro" \ -v /root/ipsec/ikev2-vpn-data:/etc/ipsec.d \ -v /lib/modules:/lib/modules:ro \ -p 500:500/udp \ -p 4500:4500/udp \ -d --privileged \ hwdsl2/ipsec-vpn-server ``` 此时你可以看到docker已经成功跑起来了 把容器端口暴露出去  你可以在容器的日志里看到你的服务状态以及账号密码等,这时你就可以使用PSK+password+user的方式进行IPSEC L2TP的方式来进行连接了 ##### 如果你需要IKEv2来进行连接: 再次来到ipsec下的ikev2-vpn-data目录 此时你应该看到了挂载出来的文件,(使用WinSCP等工具) 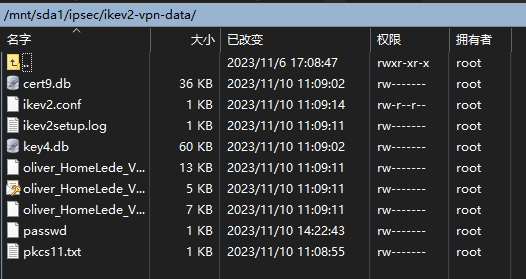 其中`.mobileconfig`文件是IOS描述文件,用于IOS系列设备的IKEV2连接 `.p12`文件是windows下的证书文件,用于windows下创建IKEV2连接 `.sswan`文件是Android设备的IKEV2连接文件 此时按照正常的连接方式连接即可,如果你不知道如何连接,善用搜索引擎和GPT 最后修改:2023 年 11 月 10 日 © 允许规范转载 打赏 赞赏作者 支付宝 赞 0 如果觉得我的文章对你有用,请随意赞赏
